Instagram

Ebates.ca

Friday, March 17, 2017

What a Coincidence?

8:48 pm 0 Comments
My due date for giving birth to my third child will supposedly on September 11, however, due to some complications during my pregnancy the doctor decided to take the baby out before this date and that was last month of August the 11th. My baby is now a month old.
I was not really hoping to have my baby born at this date because this was the date of my father’s death. I was really hoping that my baby will be born after this date but to save the life of my baby I left with no choice.

Is it really a coincidence? When I knew that I am pregnant early this year, I spoke to my husband and told him “What if the baby will be born the same date as my father passed away?” Until now, I am still mourning for his death, maybe somehow, our Heavenly Father finds a way to fulfill the gaps of my happiness as of this moment? I really don’t know. My husband told me that my thoughts was impossible so I just leave it hanging and said to myself. I am just thinking too much and worried.

The periods of my pregnancy went well until the month of July. The gestational diabetes went bad and so the condition of the baby inside. I never had an ultrasound this much until the month of July which was done every 48 hours after nurses monitored the baby’s heartbeat. I was so worried for everything but left everything to God’s hand, whatever happens, there’s a reason for it. I never forget the gesture of the doctor three days before the 11th of August, while doing the ultrasound. She tried to smile at me and spoke calmly about the situation of my baby. She did not really pointed-out that C section within 24 to 48 hours will be done depending on the changes of the condition inside. But when I went to see the doctor for diabetes he said that my C-section will be on the 11th of August thus he gave me instructions on how to prepare myself, this involved of how much dosage I had to take of the insulin the night before the operation.

After two days which was August 11, 2013 I went back to the hospital for monitor and ultrasound. It was so devastating when I heard the baby’s heartbeats stopped every minute. I started to cry and panicked, same views when the doctor did the ultrasound right after the heartbeat monitor. The baby didn’t move at all. What we heard was just hiccups and that wasn’t counted as movement. Right at that moment, the doctor decided for the emergency C-section. The operation lasted for almost 5 hours. The doctor confirmed that was the most difficult operation she ever had.


Until now, I still can’t imagine how coincidence was my thought of having my baby born same date as my father’s death? Frankly speaking, I have mix emotions sad and happiness at the same time, thinking and of course celebrating two different events in one.

(Re-post from my deleted blog way back 2013) 

Thursday, March 16, 2017

MOMMY Nursery Rhyme felt story

5:09 pm 0 Comments
This felt story is one of my final project during my last semester in Early Childhood Education at TAV College. It is also one of my favorite.

I got this idea on one of the blog when I search for a unique nursery rhyme. I really like the idea that she uses MOMMY in replace of "BINGO". Therefore, it came into my mind, to make a nice felt stories about mommy in the tune of "Bingo" dedicated to all mommies around the world especially to my Nanay (mother).

It is really a cute idea that can be use in teaching early childhood education during the celebration of mother's day. If you have felt board you can easily used and sing the nursery rhyme in the tune of "BINGO". However, if felt board is not available you can still use by placing them into your dress as you sing the nursery rhyme.


MOMMY
(Bingo)

I have a very cool friend
And Mommy is her name-O
M O M M Y
M O M M Y
M O M M Y
And Mommy is her name-O

(Follow the sequence/tune like BINGO)


My children loves to sing this improvise nursery rhyme and I am sure the other children too. The felt story will actually help the children to show their love for their mother. They will also learn the perfect nursery rhyme intended for their mother and they will appreciate more how the mother is important for them, not only being a mom but mommy can be their best friend too.


Materials I used for making MOMMY FELT STORY
·                  felt sheets of different colors
·                  glue gun 
·                  pattern for mommy 
·                  needle and thread
·                  googly eyes
Note: for the mommy pattern I draw it first and then I cut it together with the felt sheets. If someone is interested you can search online a mommy pattern or you can use even the mommy clip arts.


Mango Cheese Cake for Baptism

4:58 pm 0 Comments
Mango Cheese Cake for Baptism

July 5, 2014 was the baptism of my baby Angelo. This cake I made for him as the second baptism cake for one of my friend (Gerasil) made a Dolphin baptism cake.  The theme of the party was dolphin that's why I asked my friend to make me a cake that has a dolphin cake topper. 

In my part, I made the cheese cake with mango on top in a cross form with royal icing white rose and rosette on the side. Cheese cake is my son's favorite so I baked it for him.

Thanks for visiting and have a wonderful day.
Traffic Exchange with 1,361,000+ members


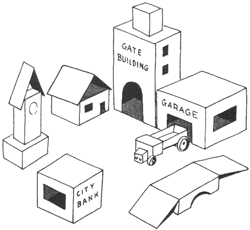
Making Box Village Activity

4:45 pm 0 Comments
Activity title and description:
Make a City or Town from Cardboard Boxes
Ideas/Photo Credits: http://www.artistshelpingchildren.org/
buildingstownscitiesartscraftstideasprojectskids.html
Box Town

Making buildings can be very fun for these age groups particularly boxes because kids loves boxes. This activity will enhance their self-esteem and develop their self confidence as they make box town together.

Rules of this activity: Divide the children into two groups. Let them choose what building design they want to create, colors, etc. Let them manipulate the materials for the activity.

Safety and health rules (if necessary): Presence of the teacher is a must.

Materials or preparation needed before the activity: 

Materials:
Boxes of various sizes, toilet rolls, tissue paper or just a roll of white paper, sticky tape, scissors, coloured paper, assorted buttons, crayons, thin masking tape, a few little cars and “villagers”

Procedures:

To make buildings: Wrap up boxes and other empty containers with colored paper. Have an adult cut out doors if wanted. Use tissue tubes for chimneys. Decorate with windows, flower boxes, etc.

To make trees: Use a tissue paper tube for the trunk. Draw a green blob on stiff paper or cardboard for the leaf canopy and cut it out. Tape the green canopy to the tube.
Setting or space needed for the activity: This activity can be done outdoor (ideal if the weather is good) or indoor. Must have a big space for two groups in order to emphasize each box town.

Support from colleagues (if necessary): For two groups yes, support is really needed so that she/he can supervise the students.
Activity introduction (starter): Introduce the materials to the students for the activity to drawn their attention. Start cutting some shape to be glued on the box building then, let the children follow or let them make their own way.

Explanation of strategy that you used: I will show to them as an example on how to cut into desired sizes of the box buildings, trees, pavement, etc. As this activity promotes self-esteem and social skills, I will let the children manipulate, construct and build according to their creativity.

Can this activity be expanded to fulfill other objectives or reinforce the main objective:
Yes, by asking related questions to the children regarding the activity they did. Likewise, describing their emotions after building the town. I will let the children talk with each other about their rules and contribution of making the box town.

Evaluate of this activity (do you meet your objectives):
Yes, I met my objectives, the children cooperate each other, discuss and giving their best to do the box town knowledgeably and creatively.

Which developmental does this activity promotes: The activity promotes physical development, creativity and language skills.
Objectives and key experiences: At the end of the activity, the children should be able to establish and accept responsibility of the assigned task.


Thursday, March 09, 2017

Maple Leaf Bird Arts and Crafts

4:56 am 0 Comments

July 1 is Canada Day and we are very proud and happy celebrating this day. To honor this very special day for Canadians, we the educators teach our young children the basic concepts of why this day is so special. So part of it is making arts and crafts. We choose the Maple leaf birds craft and the Maple leaf hat.

Maple Leaf is one of the symbols of Canada. Therefore, maple leaf has been widely use for most arts and crafts in the daycare and or any other institutions in Canada during Canada Day.

In this activity, we are not only teaching children by making arts and crafts but we are also promoting other areas of domains like, cognitive skills, fine motor skills and color recognition and a basic history of the  country.

Lesson Plan Activity:

Activity Name: Maple Leaf Bird Arts and Crafts               
Age Group:  2 to 3 years (however this activity is good also for the 4 to 5 years old or older)                        
Number of Children: 8 (the ratio of the children is depends on the age)  

·                  18 - 24 months: ratio - 6 children/1 educator
·                  2 - 3 years old: ratio - 8 children/1 educator
·                  3 - 4 years old: ratio - 8 children/1 educator
·                  4 - 5 years old: ratio - 10 children/1 educator       
Length: 15 to 20 minutes

Goal of the Activity: Promoting cognitive skills and language skills.
Objective of the Activity: The children will be able to understand the basic history of Canada day. 

Materials Required: 

·                  red and white card stocks
·                  Maple leaf pattern
·                  googly eyes

Introduction: Introduce the activity by telling the children about Canada day.

Detailed Progression of the Activity:
·                  Prepare all the materials needed for the activity.
·                  Lay the Maple leaf pattern to the red and white card stock then cut.

·                  Let the children assemble the bird but the educator should help the children one by one especially when applying the glue.

Note: credits belong to the original person who shared this idea... 

Popular Posts